Monday, May 27, 2013

Beef Bourguinon


Is this not the most beautiful thing you have ever seen??? My lovely cousin gave me this gorgeous Le Creuset pot for my 30th birthday last month (she knows me well). I have been so taken with it that it has been sitting unused in the dining room for the last 4 weeks. I would stare at it every day and marvel at its finish, colour and size, all the while being terrified of actually putting it to use.

I felt that it's maiden voyage needed to produce something special...something worthy of the gourmet cookware it was being prepared in.

So, Beef Bourguinon it was! A relatively simple dish, with minimal ingredients but anything that calls for a full bottle of red wine is DEFINITELY special.

INGREDIENTS

2-3 tbsp olive oil
50g butter
2 tbsp seasoned flour
1.2 kg chuck or shin steak, cut into large chunks (about 5cm)
18 small shallots or button onions
18 button mushrooms
1 large onion, sliced
100g bacon or pancetta, cubed
4 cloves garlic, crushed but left whole
2 bay leaves
2 sprigs thyme
750ml red burgundy wine

DIRECTIONS
Heat olive oil and butter in casserole, toss beef in seasoned flour then brown in batches over medium-high heat.

Remove and set aside. Add shallots and caramelise, set aside on separate plate, repeat with button mushrooms and add to shallots.

Add little more oil if necessary and fry sliced onion and bacon until onions softened and bacond browned.

Add garlic, bay and thyme then return beef and any juices to casserole and stir together.

Pour in the wine, season, bring to a simmer then lower heat and simmer gently on the stove, partly covered, for two hours (or cover and transfer to oven at 140C). 

Add the shallots and mushrooms and simmer for a further half an hour. Check for seasoning and serve. This gets better and better as leftovers also!!

Sadly, the picture of the finished product does not look as spectacular as it tasted. I guess I had tired myself out from playing badminton and volleyball all afternoon while it simmered.


NUTRITIONAL INFORMATION
An indulgence...just leave it at that.


Parmesan Zucchini Crisps

I made these for a family BBQ a few weeks ago and they were gobbled up immediately. I put out some Tzatziki in case people wanted to dip them in something but most seemed to prefer them on their own. A simple marinara sauce might be a good dip option as well.
INGREDIENTS

1 oz Parmesan, freshly grated
1/4 cup bread crumbs panko
black pepper, to taste
garlic powder, to taste
2 egg whites
2 ½ cups zucchini rounds, sliced about 1/4” thick (this was about 2 small zucchini)

DIRECTIONS

1.    Preheat oven to 425. Line two baking sheets with aluminum foil and place a wire baking rack on top (I used two metal cooling racks).Lightly mist the racks with cooking spray.
2.    Combine the Parmesan, bread crumbs, pepper and garlic powder in a shallow dish and mix together.
3.    In a small bowl, beat the two egg whites. Dip each zucchini round in the egg whites to coat both sides and then press each side of the round into the bread crumb/Parmesan mixture. Place the coated round on the wire rack on the baking sheet. Repeat with remaining zucchini rounds.
4.    Bake for 30-35 minutes until the Parmesan and bread crumb coating is browned and crisp. Serve immediately.
NUTRITIONAL INFORMATION

Serves 4
WW Points - 2
Calories - 71
Carbs - 7g
Fat - 2g
Protein - 6g
Fibre - 1g

Tuesday, May 21, 2013

(Lightened Up) Raspberry Cheesecake Muffins


First off, don't let the name fool you. These guys are WW friendly (I actually am eating them for breakfasts all week) but I had to give them such a decadent name because they taste like they should be a gourmet dessert!

INGREDIENTS

5 oz 1/3 less fat cream cheese, softened
3 tbsp butter, softened
3 tbsp unsweetened applesauce
1 1/2 cup sugar
1 1/2 tsp vanilla extract
2 large egg whites
1 large egg
1 cup all-purpose flour
1 cup white whole wheat flour
1 tsp baking powder
1/4 tsp baking soda
1/2 tsp salt
1/2 cup buttermilk
2 cup raspberries (fresh or frozen)

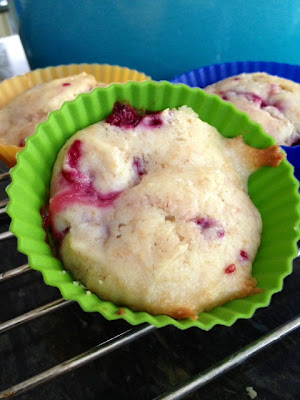
NOTE: I couldn't find the baking soda when I was making these so I omitted it, but it really is necessary for a less dense/more airy texture (as you can see from the stubby muffin in the pic below). Clearly not necessary for taste though, since these were still out of this world!!


DIRECTIONS

Preheat the oven to 350. Line 24 muffin cups with cupcake liners.

In a large bowl, combine the cream cheese, butter and applesauce and beat with a mixer until blended. Add sugar and beat until combined. Add vanilla, eggs and egg whites and beat until blended.

In a separate bowl, combine the flour (lightly spoon into measuring cups and then level with a knife), baking soda, baking powder and salt and stir together. In the bowl containing the wet ingredients, use the mixer on a low speed while pouring in the flour mixture and the buttermilk. Beat until blended. Add raspberries and fold in gently.

Spoon the batter evenly into the liners. Bake for 25 minutes. Cool on a wire rack.

NUTRITIONAL INFORMATION

Serving Size - 1 Muffin
WW Points - 3


Mexican Ranchero Casserole


Every sunday I generally spend the day in the kitchen prepping and cooking a dish that I portion up for weekday lunches. I've been growing tired of all my regular rotation items (Baked Beef Ziti, Stuffed Chicken Breasts, Chili, etc) and was trying to come up with something a little bit different.

BINGO!

This is an incredibly simple dish with LOTS of flavour!! You could easily sub the ranchero sauce for enchilada sauce, salsa verde or anything else that has a strong flavour.

I just ate the first round of it a few minutes ago and it has an awesome creamy texture that balances well with the spicy sauce.

INGREDIENTS

1 lbs extra lean ground turkey
1 medium onion, chopped
10 oz can ranchero sauce
1 small can of chillies in adobo sauce, chopped (these can make it quite spicy so adjust to your own taste)
1 (15 oz) can tomato sauce
1 can black beans, drained and rinsed
1 can Pillsbury biscuits, cut into quarters
1 cup shredded cheese (I used mozzarella and cheddar)

DIRECTIONS
1.    Preheat oven to 350 degrees. Lightly mist a 9 x 13 baking dish with cooking spray and set aside.
2.    Brown turkey and onions in a large skillet or sauté pan.
3.    Add the ranchero sauce, tomato sauce, chillies and black beans and stir to combine. Stir the biscuit pieces into the meat mixture.
4.    Transfer the entire mixture to the prepared baking dish and spread out evenly. Bake for 25 minutes. Remove from the oven and sprinkle the cheese on top. Bake an additional 10 minutes. Let stand for 5 minutes before serving.

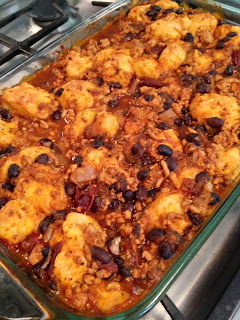
Here's a pic before the cheese was added


NUTRITIONAL INFORMATION

Serves 6-7
WW Points - 7
Calories - 307
Carbs - 34g
Fat - 6g
Protein - 32g
Fiber - 4g


Thursday, May 2, 2013

Stanley Cup Peanut Butter Cupcake Face-off

So, what do you do when you are trying to not eat cupcakes but you are craving them so violently that it is effecting your day???


Go home and make a double batch of course!!!! Oh and then maybe throw some blue and white sprinkles on them and tell people its in honour of the Maple Leafs kick-off play off game. That way they won't think you are some crazy person who gets home from a long day of work and crazily sets about baking two batches of cupcakes JUST to audition icing flavours...because that would cray cray!!


Clutterbuck and I have been obsessing over a local cupcakery’s chocolate peanut butter cupcake lately. It is so good that we are having trouble controlling ourselves…OK, I am having trouble controlling it but Clutterbuck is ALWAYS game to join in.

Anyway, his Mother’s Birthday is coming up so I figured I’d use that as an excuse to make my own version of this glorious cupcake. However, I have a dilemma….Of all the countless times that I scarfed down the original PB creation I never once stopped to assess what exactly I thought was in the icing. So off I went to the internet for some inspiration. Well….it turns out there are several different versions of PB icing out there, I got a little overwhelmed with the options so I did what most people would do and made two different batches, obviously!

On the left side we have Cupcake A and on the right side we have Cupcake B:

Cupcake A - found online and adapted to my taste

INGREDIENTS
4 oz unsalted butter, room temperature
4 oz cream cheese, room temperature
2-3 cups icing sugar, until desired sweetness is reached (I tend to reduce this amount usually)
1 tsp vanilla extract
2-3 tbs milk, if needed to reach desired consistency
1/3 cup (approx.) natural, unsweetened peanut butter

*NOTE: There have been some reports online that using natural peanut butter will cause the oil to separate in the icing after its been sitting for a while. I have not found this as of yet (They've now been sitting for 16 hours and show NO signs of separating. Plus, consider the amount of sugar that goes into these recipes, personally I think that using a sweetened peanut butter would end up sacrificing the peanut flavour and just adding more sweetness.

DIRECTIONS

Cream butter and cream cheese together with electric mixer (I used my beloved Kitchenaid). Add vanilla and then gradually add in sugar until icing is smooth. Make sure to scrape the sides of the bowl occasionally. Then gradually add peanut butter until desired taste is reached and mix in milk one tablespoon at a time if icing appears to be too dry (I didn't need any milk this time).

I made this version first and thought it was a winner. The taste is a perfect balance between cream cheese and peanut butter (seriously, what could be better??). Its a bit on the softer side because I didn't really want to add any more sugar to it. It was OK to pipe with once it chilled in the fridge for a while. However, once I compared it with the next recipe I was still confused because there is something nice about the purer peanut butter flavour in the buttercream version as well.

Cupcake B - The classic buttercream recipe with peanut butter mixed in

INGREDIENTS
1/3 cup shortening, room temperature
1/3 cup butter, room temperature
3/4 cup natural, unsweetened peanut butter
1 tsp vanilla extract
3-4 cups of icing sugar, I went with 3
4-6 tbs of milk

DIRECTIONS
Cream shortening and butter together with electric mixer. Add peanut butter and vanilla. Gradually add sugar, one cup at a time, beating well on medium speed. Scrape sides and bottom of bowl often. When all sugar has been mixed in, icing will appear dry. Add milk, one tablespoon at a time, and beat at medium speed until light and fluffy.

This recipe was definitely the winner in terms of piping ability. You really can't beat the consistency that shortening brings to the table. However, it definitely had that traditional buttercream icing taste which wasn't necessarily what I was looking for alongside the peanut butter...but it was still divine!!


The taste test is happening all day today and I even have two extra-minis on my desk waiting to be compared after my lunch. Oh yeah, I forgot to mention that....there was a method to my madness because baking and decorating the cupcakes satisfied the craving completely. I actually haven't eaten one yet.

I will report on any findings, but I think the moral of the story here is that you can't go wrong either way!!!


Sorry folks, no nutritional information here....you probably wouldn't want to know it anyway!!